
How to Install Playground Borders
Our company sells and ships plastic borders of all kinds to all 50 United States. From Maine to California, Miami to Honolulu, we can ship any quantity of borders you need. We also ship internationally. However, our company’s actual work area for installing borders is limited to the Maryland – Washington, DC – Virginia area. The good news is that it’s easy to install these borders yourself, using a sledgehammer or a mallet.
Considerations for Installing Playground Borders
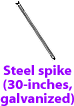
Our borders are installed by sliding a 30-inch steel spike through the vertical openings in the plastic borders (which are 12 inches tall), then driving the spike into the ground an additional 18 inches below the surface with a sledgehammer or heavy mallet. So, the person handling the installation of the borders should try to determine ahead of time the type of soil and the presence of any foreign objects beneath the surface, like rocks, industrial pipes, and sprinkler systems. Checking with the relevant surveying or excavation resource organization (known as “Miss Utility” in some states) is not usually necessary but is never a bad idea.
Unfortunately, our borders cannot be installed over hard surfaces like concrete or blacktop — unless you want to drill several 18-inch deep holes into that surfacing, to accommodate the steel spikes that hold the borders in place.
Permitting is rarely needed for installing our plastic borders. The attachment spikes only go 18″ below the surfacing, and these borders aren’t considered a permanent structure of any sort, since they’re made of roto-molded (hollow) plastic and the spikes can be removed in order to relocate the borders.
Plastic borders are very easy to install, whether it’s on a commercial playground or in your backyard. Each 4-foot plastic border comes with a single 30″ spike; each 6-foot border comes with two spikes. The plastic borders and spikes are supplied by Maryland Materials, a leading national playground equipment and services company.
Step 1 for Installing Playground Borders
If necessary, prepare the ground surface by clearing a small horizontal path slightly wider than the width of the plastic borders (4″). This will make it easier to install the plastic border. If the ground is hard, you may want to water it first, to soften it.
Step 2 for Installing Playground Borders
![]() Place one plastic border on the ground, standing straight up. Place another plastic border next to it, then slide them together, matching the overhang on one border with the underhang on the other.
Place one plastic border on the ground, standing straight up. Place another plastic border next to it, then slide them together, matching the overhang on one border with the underhang on the other.
Step 3 for Installing Playground Borders
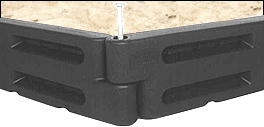 Place a 30″ spike in the hole on the top horizontal side of the first plastic border at a 180° angle. Slide the spike through the overhanging part of that border into the underlying part of the second plastic border. Continue until the spike touches the ground below.
Step 4 for Installing Playground Borders
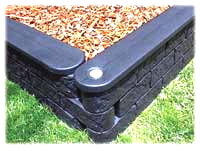 Using a hammer, a mallet, or a sledgehammer, drive the spike into the ground until the top of the spike is level with the flat horizontal side of the plastic border.
Step 5 for Installing Playground Borders
Repeat Steps 2 – 4 for each plastic border until the project is complete. It’s really that simple! If you have any questions about the plastic borders or how to install them, just phone us toll free. We’re standing by to help, and we have installed these on dozens (if not hundreds) of playgrounds, so we know exactly how to do it in a variety of settings. Don’t be shy!